Virtualenv and package control
The purpose of a virtualenv and how it worked confused me at first, so I’m going to take a bit of time to explain what it is, what it does and how it works with pip.
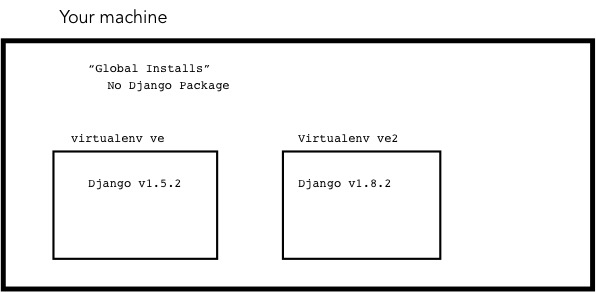
Basically, virtualenv allows you to have different versions of software and packages on your machine at the same time. Instead of messing about with root folders and installs, you can use virtualenv to create an isolated environment in which you can use that version. So say for example, we want a local version of Django (a web framework written in python), but we don’t want a global version installed. (Assume Django is not installed on this machine) First we navigate to the directory we want to work in (in this case test), and create our virtualenv:
$ cd ~/test
$ virtualenv ve
The ve is the name we’ve given our virtualenv. This could be anything, but our convention is to use ve and naming it something else will cause issues with the Universalcore repos and probably most others as well. The examples below assume that this is what you have named it. After this command, you’ll get something like this
$ virtualenv ve
new python executable in ve/bin/python
Installing setuptools, pip...done.
$
If you run ls, you’ll see that there is now a directory called ve. Add ve to your .gitignore file if it’s not there already. This will avoid potential problems and git tomfoolery, like uploading all the install files to github. Ouch. The ve folder is where the settings are kept for this particular virtualenv, but it’s not currently “activated” or “on”. To do that we need to enter this:
$ source ve/bin/activate
(ve)$
See that (ve) before your command prompt? That indicates that the virtualenv called ve is active. So now we can install django. If we don’t specify a version, it will install the latest stable version of django. We’ll install v1.5.2 here for funsies.
(ve)$ pip install django==1.5.2
Downloading/unpacking django==1.5.2
  Downloading Django-1.5.2-py2.py3-none-any.whl (8.3MB): 8.3MB downloaded
Installing collected packages: django
Successfully installed django
Cleaning up...
(ve)$
Pretty easy, right? So now let’s check what we’re working with by opening python, importing django as a package, seeing what version we have and then quitting the python shell.
(ve)$ python
Python 2.7.6 (default, Sep  9 2014, 15:04:36)
[GCC 4.2.1 Compatible Apple LLVM 6.0 (clang-600.0.39)] on darwin
Type "help", "copyright", "credits" or "license" for more information.
>>> import django
>>> django.VERSION
(1, 5, 2, 'final', 0)
>>> ^D
(ve) $
Now let’s “turn off” the virtualenv. This is done using
(ve)$ deactivate
$
See that the (ve) has disappeared? Now let’s try and use the django package:
$ python
Python 2.7.6 (default, Sep  9 2014, 15:04:36)
[GCC 4.2.1 Compatible Apple LLVM 6.0 (clang-600.0.39)] on darwin
Type "help", "copyright", "credits" or "license" for more information.
>>> import django
Traceback (most recent call last):
  File "<stdin>", line 1, in <module>
ImportError: No module named django
We get an import error because it’s not there; we isolated it within our virtualenv.
We create a virtualenv per repo that we work with. So we’ve been working in a repo or directory ~/test. Let’s create a second directory and install the latest version of Django. To help make a point, I’m going to name this virtualenv ve2. Remember that by convention we call it ve.
$ cd ~
$ mkdir test2
$ cd test2
$ virtualenv ve2
New python executable in ve2/bin/python
Installing setuptools, pip...done.
$ source ve2/bin/activate
(ve2)$ pip install django
Downloading/unpacking django
  Downloading Django-1.8.2-py2.py3-none-any.whl (6.2MB): 6.2MB downloaded
Installing collected packages: django
Successfully installed django
Cleaning up...
(ve2)$ python
Python 2.7.6 (default, Sep  9 2014, 15:04:36)
[GCC 4.2.1 Compatible Apple LLVM 6.0 (clang-600.0.39)] on darwin
Type "help", "copyright", "credits" or "license" for more information.
>>> import django
>>> django.VERSION
(1, 8, 2, 'final', 0)
>>> ^D
(ve2)$
But what happens if I don’t deactivate the virtualenv and navigate back to the original directory called ~/test and use Django?
(ve2)$ cd ../test
(ve2)$ python
Python 2.7.6 (default, Sep  9 2014, 15:04:36)
[GCC 4.2.1 Compatible Apple LLVM 6.0 (clang-600.0.39)] on darwin
Type "help", "copyright", "credits" or "license" for more information.
>>> import django
>>> django.VERSION
(1, 8, 2, 'final', 0)
>>> ^D
(ve2)$
See that we’re still working with the latest version of Django (that’s v1.8.2 not v1.5.2)? That’s because a virtualenv will work across directories. This may seem obvious beacuse ve2 is still there, but remember that all our virtualenvs are called ve, so our helpful litte tag (ve)$ is not going to help us remember to switch virtualenvs in our day to day work. So always remember that if you’re switching the repos that you’re working in, deactivate your current virtualenv, navigate to the directory that you want to work with (and that contains the appropriate ve directory) and then run the activate command again. The deactivate command can be run no matter what directory you’re in, but you must be in the directory with the virtualenv folder, in order to activate it.
(ve2)$ pwd
~/test
(ve2)$ deactivate
$ source ve/bin/activate
(ve)$ python
Python 2.7.6 (default, Sep  9 2014, 15:04:36)
[GCC 4.2.1 Compatible Apple LLVM 6.0 (clang-600.0.39)] on darwin
Type "help", "copyright", "credits" or "license" for more information.
>>> import django
>>> django.VERSION
(1, 5, 2, 'final', 0)
>>>
Here’s a visual representation of how this all works.
Often when I’ve run into problems with running sites locally on my machine, it’s because my installed packages are not up to date. This usually helps:
(ve)$ pip install -r requirements.txt
(ve)$ pip install -r requirements-dev.txt
This will check what versions are installed and if any need updating, will update for you.